Quantcast
Channel: Minecraft Forum
Viewing all 7802 articles
Browse latest View live

[1.12.1] Doggy Talents Mod Download

$
0
0

Doggy Talents Mod is able to set your dogs to docile so that they are not attacking anything. As a matter of fact, this mod is made for anyone have a dog or just like dogs. You can switch their attack setting by right clicking on them with a sign.

Doggy-Talents.png

Features:

  • 19 unique talents you can give your dog
  • Dog leveling system
  • Play fetch with your dog
  • Care for your dog with beds, food bowls etc
  • Track your dogs with radio collars on a radar
  • Upgraded AI from the wolf
  • New hunger system, don’t worry about your dog dying unnecessary
  • Much more, check out the mod yourself!

First You will need to tame a Vanilla wolf.

Then right click on the wolf with a training treat. And he will become a dog.

To make sure he is right click on him with s stick and it will come up with the Dogs Gui, where you can rename your dog and add talents to him.

As you see now there are less talents (At the moment more coming soon) that the original mod. You can now rename him and a label will appearer on the dog.

To level up your dog simple right click agian with a training treat. For every level you dog goes up you dog gets 1 point to spend on talents.

Once you dog reachs level 20 you will have to use Super treats then once it reachs level 40 you will have to use Master treats. This will take you dog to level 60. After that you can use Dire treats to up his dire level. Once his dire level reachs level 30 he will get more health and attack strenght and will have ender portal particles around him.

Documentation:

You first task would be to create a training treat and feed it to one of your tamed wolfs. In doing so your wolf has now become a dog: a much more playful and useful friend to have at your side. If you are unsure whether you now have a dog or think I am misleading you right click your dog with a plain old vanilla stick. BAMM there you have it, the gui where you can edit details, give talents, change your dogs name etc. It looks like this…

Doggy-Talents-1.png

You can increase the level of a talent to level 5 but as you go up the level costs more points. Thought usually if you get a talent to level 5 your dog will get an extra special ability’s. As you it gets more expensive as the level gets higher, so to level up from 1 to 2 it costs 1 point, from level 3 to 4 it costs 3 points.Now how do you get these points? Well there are 4 tiers of treats, they are…

Doggy-Talents-2.png

Training Treat (Can take the dog up to level 20)! Super Treat (Can take the dog to level 40)! Master Treat (Can take the dog to level 60) ! Dire Treat which adds to the dire level. And once the dog reaches dire level 30 he is an ultimate dog!

Every time you level your dog up he gets 1 more point to spend on skills, your dog starts off with 15 skill points which is enough to get 1 skill to level 5 (1 + 2 + 3 + 4 + 5 = 15).

The Talents:

There are currently 19 different talents you can give to your dog they are…

  • BlackPelt: Improves critical hit rate, which increases damage by 50%.
  • GuardDog: Increases the chance that your dog will completely block a physical attack.
  • HunterDog: Every level grants a 10% chance to make anything your dog kills drop its loot twice. Level 5 grants an extra 10%, bringing it up to a 60% chance.
  • HellHound: Lets your dog set things on fire with its attacks. The higher the level, the longer the fire lasts. Level 5 grants your dog immunity to all fire damage.
  • PackPuppy: Each level gives your dog 3 inventory slots in its PackPuppy GUI. To open the GUI right click on your dog with a plank in hand! At level 5, your dog will also automatically pick up any nearby items if it has space in its inventory.
  • PillowPaw: Every level lets your dog fall 3 more blocks before it starts taking damage. Mastering this skill makes your dog completely immune to fall damage, and also capable of floating/gliding when it jumps.
  • ShepherdDogs: Put some wheat in your hand, and any trained ShepherdDogs will immediately rustle up some nearby livestock and carry them for you, making it easier to transport livestock long distances. This is quite tiring though, and costs a lot of nourishment (the cost is reduced with higher levels in the skill). To have your dog drop the animal, simply right-click on the dog.
  • CreeperSweeper: A dog with this skill can smell creepers in the area, and if your dog isn’t sitting, it will growl to warn you. The range at which your dog can detect creepers increases by 6 blocks per level, and mastering this skill will make your dog capable of attacking creepers. Your dog will reset the creeper’s detonation timer with each attack.
  • DoggyDash: Increases your dog’s movement speed while chasing a target. Every level grants a 12% increase, and mastering it grants an additional 15% increase.
  • FisherDog: Whenever your dog enters the water, it may catch a fish, which it will give to you when it shakes itself dry. The chance of catching a fish increases with level, and any points in HellHound may cause the fish to be pre-cooked. Mastering this skill lets your dog breathe underwater.
  • HappyEater: Increases the NP your dog gets from food items by 10% per level. In addition, level 3 lets your dog eat rotten flesh, and level 5 lets your dog eat fish.
  • BedFinder: While a dog with this skill is on your head, your bed will be highlighted in a black outline. To get the dog on you head right click on him with a bone in hand. The range at which it can do this is equal to 200 blocks per level, but becomes infinite at level 5.
  • PestFighter: Inflicts 1 point of damage on all nearby silverfish at random. Increasing the skill level increases the range by 3 blocks, and mastering the skill doubles the damage.
  • PoisonFang: Your dog’s attacks will poison their target, and the poison’s duration increases with level. At level 3 your dog becomes immune to poison, and mastering this skill allows you to cleanse yourself of all potion effects, including poison, by right-clicking on your dog with a spider eye, at the cost of 30 NP.
  • QuickHealer: Improves the rate at which your dog heals without needing to rest. Max this out and your dog will be able to heal 50% faster by sitting.
  • RescueDog: If you’re at critical health and a dog with this skill is following you, it will attempt to heal you half a heart per level in this skill, at the cost of 100 NP. Mastering this skill reduces the cost to 80 NP.
  • PuppyEyes: This skill will cause your dog to warm the heart of any villager, prompting the villager to give you presents! Higher levels in the skill increase the quality of the random gifts. This can only be done once every two Minecraft days. Mastering the skill allows you to do this once every Single Minecraft day.
  • Wolf Mount: This allows you to ride your dog at speed around the land. To mount your dog jump and right click on the dog with nothing in your hand. With each level it also increases the height your dog can jump. Beware NP points drain faster while riding your dog.
  • Swimmer Dog: Allows you to ride your dog in water and it to breath longer underwater. Maxing it allows the rider to see easily underwater
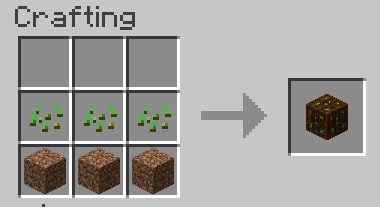
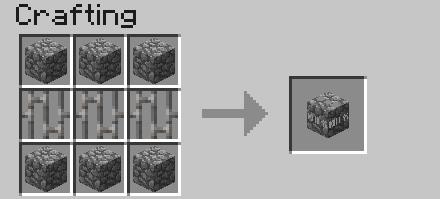
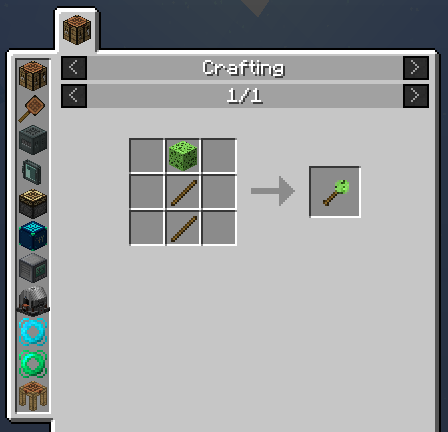
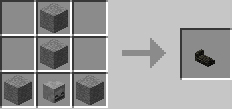
Crafting Recipes:

How to install:

  • Download and install Minecraft Forge.
  • Download the mod.
  • Go to %appdata%.
  • Go to .minecraft/mods folder.
  • If the “mods” folder does not exist you can create one.
  • Drag and drop the downloaded jar (zip) file into it.
  • Enjoy the mod.

The post [1.12.1] Doggy Talents Mod Download appeared first on Minecraft Forum.


[1.12.1] Gendustry Mod Download

$
0
0

Gendustry Mod is a mod that expands upon Forestry’s bee breeding. It provides the Industrial Apiary which is an upgradable Apiary. It also allows for the manipulation of the genetics of bees, trees, and butterflies with the Genetic Sampler and Genetic Imprinter. The Mutatron can force the mutation of bees and trees by utilizing Mutagen.

Gendustry Mod

Features:

  • Advanced powered apiary with tons of upgrades
  • Genetic manipulation of bees, trees and butterflies
  • Forced mutation
  • Construction of new organisms from genetic templates

Overview

Requires:

Minecraft Forge

Forestry Mod

BdLib

How to install Gendustry Mod:

  • Download and install Minecraft Forge.
  • Download and install BdLib.
  • Download and install Forestry Mod.
  • Download the mod.
  • Click on the Start Menu in Windows.
  • Type run into the search box, and select the Run program at the top of the results.
  • Type %appdata% into the Run program, and press Enter.
  • Go to .minecraft/mods folder.
  • Drag and drop the downloaded jar (zip) file into that.
  • Enjoy the mod.

The post [1.12.1] Gendustry Mod Download appeared first on Minecraft Forum.

[1.12.1] Gravel Miner Mod Download

$
0
0

Gravel Miner Mod will make your mining trips more enjoyable by getting rid of the falling gravel problem that everyone has run into before.

Gravel Miner Mod

You can either:

  • Install it on your client and it will automatically place torches from your hotbar below falling gravel and retrieve the torch afterwards
  • Or install it on your server (or singleplayer world) and it will insta-break gravel blocks above the block you mine, before they fall down

That means this mod works on clients, even if slightly less convenient than the server-side version. It will auto-adjust based on latency / TPS lag, so if it fails to get good timing with the torch placement, let it fail and it will learn and be less likely to fail next time.

When installed on a server, the mod uses an opt-in system for players: only those who want to use its functionality need to install the mod on their client. Players can connect without it just fine.

Server

http://media-elerium.cursecdn.com/attachments/35/764/gravelminerserver.gif

Client

http://media-elerium.cursecdn.com/attachments/35/763/gravelminerclient.gif

How to install Gravel Miner Mod:

  • Download and install Minecraft Forge.
  • Download the mod.
  • Click on the Start Menu in Windows.
  • Type run into the search box, and select the Run program at the top of the results.
  • Type %appdata% into the Run program, and press Enter.
  • Go to .minecraft/mods folder.
  • Drag and drop the downloaded jar (zip) file into that.
  • Enjoy the mod.

The post [1.12.1] Gravel Miner Mod Download appeared first on Minecraft Forum.

[1.12.1] Morpheus Mod Download

$
0
0

Morpheus Mod is a server-only mod that adds sleep voting to a forge based server. When a player sleeps, all other players in the same dimension are notified so it is easier to coordinate. Also, you can configure a ratio of players that are required to make it morning (default 50%) messages can be customised in the config and alerts can be turned off if needed.

How to install:

  • Download and install Minecraft Forge.
  • Download the mod.
  • Click on the Start Menu in Windows.
  • Type run into the search box, and select the Run program at the top of the results.
  • Type %appdata% into the Run program, and press Enter.
  • Go to .minecraft/mods folder.
  • Drag and drop the downloaded jar (zip) file into that.
  • Enjoy the mod.

The post [1.12.1] Morpheus Mod Download appeared first on Minecraft Forum.

[1.12.1] Chance Cubes Mod Download

$
0
0

Chance Cubes Mod is a Lucky Block alternative mod. Explore your world and open these mystical blocks to obtain random rewards. Some rewards are helpful while other can be devastating. From rewards that spawn in hordes of zombies and death traps, to one tbat build full houses and provide next level items, each reward has its own unique twist to make the feel special.

This mod is a simple random block mod. It not only provides you with a craftable chance block but also gives you pendants and items to help increase or randomize the luck of these blocks. The Chance Cube is a block added by Chance Cubes. They generate randomly around the world on the surface and emit light. A random effect will occur when the Cube is broken.

Features:

Chance Cube
Chance Icosahedron
Chance Items

Chance-Cubes-Mod-8.PNG

Chance-Cubes-Mod-9.jpg

How to install:

  • Download and install Minecraft Forge.
  • Download the mod.
  • Go to %appdata%.
  • Go to .minecraft/mods folder.
  • If the “mods” folder does not exist you can create one.
  • Drag and drop the downloaded jar (zip) file into it.
  • Enjoy the mod.

The post [1.12.1] Chance Cubes Mod Download appeared first on Minecraft Forum.

[1.12.1] Pressure Pipes Mod Download

$
0
0

Pressure Pipes Mod allows for unlimited input/output of any liquids that is supported by forge. It includes different types of filters and pipes that you can use to transfer unlimited amounts of fluid without much trouble. What makes it even better is that the pipe system can handle different types of fluid at the same time. This means you won’t need to build separate ones for each type that you want to move. These fluids are then filtered by type on the output filter blocks so you can use whichever you need. This mod is a great way to practice your plumbing skills as it involves a lot of intricate planning to get a good system.

Pressure Pipes Mod

This mod implements various kinds of blocks that help make transferring fluid more efficient. These blocks include High Pressure input, output, piping, pump and infinite water source. The input and output pressure blocks can be equipped with filters. All you need to do is fill it with fluid. The process of doing that is quite easy. For example, if you want to use lava, right click the block with a bucket filled with this fluid and it’s good to go. If you want to remove the filter, just right click with an empty bucket and it’s done.

Features:

  • Transfer any amount of fluid
    • Unlimited input/output
    • Works with all forge fluids and all pipe/tanks from other mods
    • Can transfer multiple liquids on the same pipe
    • Filtering by fluid type on input and outputs
    • Multiple inputs and outputs on the same pipe
    • Smart distribution between valid outputs
    • Fully supports Forge Multipart (1.7.2+ versions)
  • Multiblock Free Form Tanks
  • Handy Hand Pumps and Canisters

Blocks:

  • High Pressure Input
    • Accepts fluids from pipes on the back (brighter side without arrows)
    • Connects to a pressure pipe on the front (darker side with arrows)
    • Will only accept fluids if a valid output is connected with a high pressure pipe
    • If multiple outputs are connected – will do it’s best to distribute the fluid evenly
  • High Pressure Output
    • Connects to a pressure pipe on the back (darker side without arrows)
    • Outputs fluids into pipes/tanks on the front (brighter side with arrows)
  • High Pressure Piping
    • Connects outputs and inputs
    • Can be layed in any shape, loops and intersections will not cause problems
  • High Pressure Pump
    • Pumps fluids between tanks, pipes or High Pressure Inputs
    • Will pump as much fluid as possible per tick
    • Needs redstone signal to activate
  • Infinite Water Source
    • Exactly what it says on the tin
    • Is really infinite for all intents and purposes
    • Water can be piped out using a High Pressure Pump or pipes from other mods

Filtering:

  • Inputs, Outputs and Pipes can have filters set, to set a filter – right click with a bucket (or any other valid container) filled with the fluid. To remove a filter – right click with an empty bucket in your hand.

Pressure System

Pressure Pipes Mod 1

Tanks

Pressure Pipes Mod 2

Pressure Pipes Mod Wiki Page:

http://bit.ly/2oFmNFA

Requires:

Minecraft Forge

BdLib

How to install:

  1. Make sure you have already installed Minecraft Forge and BdLib.
  2. Locate the minecraft application folder.
    • On windows open Run from the start menu, type %appdata% and click Run.
    • On mac open finder, hold down ALT and click Go then Library in the top menu bar. Open the folder Application Support and look for Minecraft.
  3. Place the mod you have just downloaded (.jar file) into the Mods folder.
  4. When you launch Minecraft and click the mods button you should now see the mod is installed.

The post [1.12.1] Pressure Pipes Mod Download appeared first on Minecraft Forum.

[1.12.1] Architect Mod Download

$
0
0

Architect Mod provides a small toolset to make building repetitive structures a breeze. It allows creating Blueprints (patterns) of structures in the world using a simple but powerful selection system: single blocks can be toggled to be included in a Sketch by right-clicking them, ranges can be added/removed by sneak-right-clicking to start a selection and then finish it by right-clicking again to include the selection, or sneak-right-clicking again to remove the selection.

Once a selection is satisfactory, a Sketch can be converted into a Blueprint by holding right-click for a little over one second (think eating food). Blueprints can then be used to place the saved pattern in the world wherever you like. Placement follows a grid of the granularity of the blueprint’s bounds (to easily allow placing a blueprint in a repeating fashion).

The position can be fine-tuned by scrolling the mouse-wheel while sneaking – this shifts the placement along the axis the player is currently looking along. Rotate blueprints by pressing R (rebindable in the controls options).

Materials for construction of a placed blueprint will be extracted from the player’s inventory. To avoid running out of materials quickly, an Item Provider may be used. This item can be bound to an inventory in the world (such as chests). As long as a bound provider is in the player’s inventory, materials will be pulled from the bound inventory before pulling from the player’s inventory. There is a range limit, however.

Requires:

Minecraft Forge

How to install:

  1. Make sure you have already installed Minecraft Forge.
  2. Locate the minecraft application folder.
    • On windows open Run from the start menu, type %appdata% and click Run.
    • On mac open finder, hold down ALT and click Go then Library in the top menu bar. Open the folder Application Support and look for Minecraft.
  3. Place the mod you have just downloaded (.jar file) into the Mods folder.
  4. When you launch Minecraft and click the mods button you should now see the mod is installed.

The post [1.12.1] Architect Mod Download appeared first on Minecraft Forum.

[1.12.1] Reliquary Mod Download

$
0
0

Reliquary Mod is a collection of magical items and blocks that may be challenging to get. However, this mod makes player’s life easier in many different areas. Let’s enjoy this mod with us!

Features:

Blocks and Items:

  • Coin of Fortune – magnet that teleports items and experience to player
  • Hunter’s Handgun – handgun that can be loaded with a variety of different shots (like shots that seek their target, or make creepers explode, …)
  • Infernal Chalice – a portable lava storage, but also an item that prevents the player from being hurt in lava (in exchange for some hunger)
  • Interdiction Torch – torch that pushes mobs in its range away
  • Lilypad of Fertility – lilypad that makes nearby crops grow faster and that can be put side by side with other lilypads for even greated effect
  • Nian Zhus – item that makes mobs ignore player (each of them specific to a mob type – creeper Nian Zhu, zombie Nian Zhu, …)
  • Sojourner’s Staff – staff that can hold multiple stacks of torches and then place these in world, close to the player as usual or even at great distance for additional cost
  • Void Tear – item that can hold a huge number of stacks of a specific item (no more cobble clutter)
    Witherless Rose – flower that prevents player who has it in their inventory from being withered

Pedestal:


Pedestal can be used as a fancy display of items, but at the same time it is functional as well when you put some specific items in

  • Picks up items and xp orbs – coin of fortune
  • Works as a tank for xp – hero’s medallion (charges the medallion with the xp)
  • Attacks mobs – sword (many different kinds work including Tinker’s)
  • Gets milk from cows or picks up liquid from the world around – bucket
  • Shears sheep or shearable blocks – shears
  • Buffs players within range with localized creative flight – Rending Gale in flight mode
  • Pushes/pulls mobs in range – Rending Gale in appropriate mode
  • Works as an automated farm – Harvest Rod

Tome of Alkahestry:

Tome of Alkahestry allows duplicating some items for a cost of its charge. By default there are not that many but include even some pretty expensive stuff like diamond or nether star (of course for a cost that’s appropriate to those).

Potion system:

Reliquary includes custom potion system that allows creating a lot of different kinds of potions. It uses some very basic ingredients like potatos up to very expensive ones like nether stars and the resulting potions have appropriately strong effect(s). Wiki has way more information on how exactly this works and all of the different ingredients and effects.

Reliquary items

Reliquary blocks

Requires:

Minecraft Forge

How to install:

  • Download and install Minecraft Forge.
  • Download the mod.
  • Click on the Start Menu in Windows.
  • Type run into the search box, and select the Run program at the top of the results.
  • Type %appdata% into the Run program, and press Enter.
  • Go to .minecraft/mods folder.
  • Drag and drop the downloaded jar (zip) file into that.
  • Enjoy the mod.

The post [1.12.1] Reliquary Mod Download appeared first on Minecraft Forum.


[1.12.1] ActuallyComputers Mod Download

$
0
0

ActuallyComputers Mod adds the ability to get and set specified values at ActuallyAdditions machines from a OpenComputers program. It’s a simple mod that doesn’t add blocks or item, you only need a adapter block besides the ActuallyAdditions machine. You can read and write the redstone state, read the fluid related stuff and read and write some variables for special tile entities. Only Actually Additions TileEntities can be manipulated.

ActuallyComputers Mod

Requires:

Minecraft Forge

OpenComputers Mod

Actually Additions Mod

How to install:

  1. Make sure you have already installed Minecraft Forge, OpenComputers Mod and Actually Additions Mod.
  2. Locate the minecraft application folder.
    • On windows open Run from the start menu, type %appdata% and click Run.
    • On mac open finder, hold down ALT and click Go then Library in the top menu bar. Open the folder Application Support and look for Minecraft.
  3. Place the mod you have just downloaded (.jar file) into the Mods folder.
  4. When you launch Minecraft and click the mods button you should now see the mod is installed.

The post [1.12.1] ActuallyComputers Mod Download appeared first on Minecraft Forum.

[1.12.1] SugiForest Mod Download

$
0
0

SugiForest Mod adds the Sugi (Cryptomeria Japonica) tree, related blocks, items and the Sugi Forest biome to Minecraft. Sugi is a popular tree in Japan. That is seen everywhere.


Requires:

Minecraft Forge

How to install:

  1. Make sure you have already installed Minecraft Forge.
  2. Locate the minecraft application folder.
    • On windows open Run from the start menu, type %appdata% and click Run.
    • On mac open finder, hold down ALT and click Go then Library in the top menu bar. Open the folder Application Support and look for Minecraft.
  3. Place the mod you have just downloaded (.jar file) into the Mods folder.
  4. When you launch Minecraft and click the mods button you should now see the mod is installed.

The post [1.12.1] SugiForest Mod Download appeared first on Minecraft Forum.

[1.12.1] Open Glider Mod Download

$
0
0

Open Glider Mod adds a hang glider to Minecraft, allowing you to soar through the skies and explore your world’s beauty.

Open-Glider.png

Notable Features

  • A fluid flight motion and naturally immersive controls.
  • A novel system of wind that you must combat to stay on course while in flight.
  • The ability to deploy the glider and have it visually appear, both in first person and in third person view, as well as to other players if you are playing on a server.
  • Aesthetically pleasing models and item sprites that change based on deployment.
  • It is specifically coded to be efficient and computer friendly.
  • Extremely configurable so that it can suit any playstyle.
    • Wind, damage, distance traveled, visual effects, and the nuances of those are all configurable, and can even be easily done in-game via the mod options config GUI.

More Informations:

Open Glider is the spiritual successor to Open Blocks‘ hang glider. Open Glider, however, has been rewritten, rebalanced, and refined for MC 1.10+.

In addition, there have been some notable changes to make this mod fit alongside Vanilla’s Elytra.Most notably this is handled by wind, a concept explained more in detail in the section below. For now simply know that great care has been taken to ensure that the hang glider still has a place in the game without overshadowing Vanilla mechanics. Open Glider aims to provide an earlier game alternative of imperfect, scenic flight to contrast with the elytra’s nature of a fast and agile end-game flight method.

To get started, craft the hang glider like so:

Open-Glider-1.png

Next, you simply right click the hang glider item to deploy it. You will know it is deployed as the item will change to resemble bars, and the glider will be visible on your back in third-person mode or above your head in first-person perspective.
Open-Glider-2.png

You can press shift and will increase your speed to fly faster, but note that this does come at the small cost of not quite as much overall distance traveled.

Now simply jump and glide away into the sunset!

Wind

The elytra is a nimble thing, able to propel the player. The hang glider is much larger, and therefore catches drafts of wind that the elytra does not. Unlike the elytra, the hang glider will deviate from its course, as wind may knock the player to the side.

Generally wind comes in gusts, and there are pockets of windy areas compared to sections of calm air. A prudent flyer will constantly correct his/her flight as they travel so as to stay on course.

Wind is affected by:

  • Speed of the player
    • By traveling quickly, the relative power of a sideways gust of wind is lessened due to havign so much forward momentum.
  • The weather (if it is raining or not)
    • Storms have been known to cause huge gusts; players must eb more vigilant if they wish to fly during a storm.
  • The height of the player
    • More powerful air currents are found high up in the sky, while staying close to the earth means there is less wind to buffet the player about
  • The durability of the glider
    • The more damaged the hang glider is, the more vulnerable it is to wind.

Of course, all of this is configurable.

Durability

The hang glider is damaged whenever it is used. Eventually, it will break and must be repaired in an anvil by using leather, similar to the elytra.
Open-Glider-3.png

Advanced Hang Glider

For those of you who like the mechanics of flight as provided by this mod, there is now a late game option as well. The advanced hang glider’s crafting recipe contains an elytra (forcing you to choose between flight preferences, albeit temporarily) and is much faster, wind resistant, and durable than the normal variant.

Requires:

Minecraft Forge

How to install:

  1. Make sure you have already installed Minecraft Forge.
  2. Locate the minecraft application folder.
    • On windows open Run from the start menu, type %appdata% and click Run.
    • On mac open finder, hold down ALT and click Go then Library in the top menu bar. Open the folder Application Support and look for Minecraft.
  3. Place the mod you have just downloaded (.jar file) into the Mods folder.
  4. When you launch Minecraft and click the mods button you should now see the mod is installed.

The post [1.12.1] Open Glider Mod Download appeared first on Minecraft Forum.

[1.12.1] Initial Inventory Mod Download

$
0
0

Initial Inventory Mod allows you to set what items a player who is joining the world for the first time, will start with.

Initial Inventory Mod

How to use:

You use ZenScript to actually set the inventory items, like this

mods.initialinventory.InvHandler.addStartingItem(, 5);
mods.initialinventory.InvHandler.addStartingItem();
  1. The first line will set the item in stack 5 to be dirt, if there is already a stack in slot 5, then it will set it to the next available slot.
  2. The second line will set the item in the next available slot to a stick.

The script files go in “/config/InitialInventory/” and can be named anything, aslong as they end in .zs

A default file is created in the folder called “inventory.zs” which can be used.

Requires:

Minecraft Forge

How to install Initial Inventory Mod:

  1. Download and install Minecraft Forge.
  2. Download the mod.
  3. Click on the Start Menu in Windows.
  4. Type run into the search box, and select the Run program at the top of the results.
  5. Type %appdata% into the Run program, and press Enter.
  6. Go to .minecraft/mods folder.
  7. Drag and drop the downloaded jar (zip) file into that.
  8. Enjoy the mod.

The post [1.12.1] Initial Inventory Mod Download appeared first on Minecraft Forum.

[1.12] World Map Mod Download

$
0
0

World Map Mod adds a self-writing fullscreen map to your Minecraft client. Works as a separate mod but is a lot better with Xaero’s Minimap. The reason why it’s available separately is to keep Xaero’s Minimap as light-weight as possible.

World Map Mod

Features:

  • Self-writing world map. Different for every world/dimension/server.
  • Works in Singleplayer, Multiplayer and on Realms.
  • Interactive interface. Open by pressing M. Move the map around with your mouse and zoom in/out using the mouse wheel, similar to Google Maps.
  • Automatic MultiWorld / Lilypadded servers support.
  • Minecraft Realms support (also with MultiWorld support).
  • Texture Pack support. Changing the texture packs updates the whole world map and not just the new chunks.
  • Cave dimensions support (similar to Nether).
  • Vanilla maps mode. Makes the world map look like vanilla paper maps.
  • Terrain texture customization.
  • “Footsteps” showing your most recent path.
  • Optional performance boosters.
  • Xaero’s Minimap integration. The minimap mod will display chunks loaded by the world map. The world map mod will display waypoints from the Xaero’s Minimap. Also works with Better PVP mod.

How to install World Map Mod:

  • Download and install Minecraft Forge.
  • Download the mod.
  • Click on the Start Menu in Windows.
  • Type run into the search box, and select the Run program at the top of the results.
  • Type %appdata% into the Run program, and press Enter.
  • Go to .minecraft/mods folder.
  • Drag and drop the downloaded jar (zip) file into that.
  • Enjoy the mod.

The post [1.12] World Map Mod Download appeared first on Minecraft Forum.

[1.12] Instant Massive Structures Mod Download

$
0
0

The Instant Massive Structures Mod is exactly as it sounds. You can craft a structure-placing block, put it on the ground, and a massive structure will instantly be generated in front of your eyes. All you need to do is craft the shape of your structure with related minecraft items.

http://minecraft-forum.net/wp-content/uploads/2015/10/2fd31__Instant-Massive-Structures-Mod.jpg

You can use Instant Massive Structures to expand your Minecraft world with a variety of detailed, easy to make structures. You can can create maps in half the time with a set of pre-made structures. Whatever you want to do, Instant Massive Structres will help you get it done in less than a second.

Instant-Massive-Structures-2-Mod.jpg
Instant-Massive-Structures-2-Mod-1.jpg
Instant-Massive-Structures-2-Mod-2.jpg
Instant-Massive-Structures-2-Mod-3.jpg
Instant-Massive-Structures-2-Mod-4.jpg
Instant-Massive-Structures-2-Mod-5.jpg
Instant-Massive-Structures-2-Mod-6.jpg
Instant-Massive-Structures-2-Mod-7.jpg
Instant-Massive-Structures-2-Mod-8.jpg
Instant-Massive-Structures-2-Mod-9.jpg

Pyramid

Instant-Massive-Structures-2-Mod-10.jpg

Tower

Instant-Massive-Structures-2-Mod-11.jpg

Enchantment Room

Instant-Massive-Structures-2-Mod-12.jpg

Lighthouse

Instant-Massive-Structures-2-Mod-13.jpg

House

Instant-Massive-Structures-2-Mod-14.jpg

Giant Tree

Instant-Massive-Structures-2-Mod-15.jpg

Farmland (in crafting receipe, replace seeds by sugar canes, melon seeds or pumpkin seeds to get different types of farms)

Instant-Massive-Structures-2-Mod-16.jpg

Storehouse

Instant-Massive-Structures-2-Mod-17.jpg

Waterslide

Instant-Massive-Structures-2-Mod-18.jpg

Bunker

Instant-Massive-Structures-2-Mod-19.jpg

Prison

Instant-Massive-Structures-2-Mod-20.jpg

Rollercoaster

Instant-Massive-Structures-2-Mod-21.jpg

Skyscraper

Instant-Massive-Structures-2-Mod-22.jpg

Torch Pattern

Instant-Massive-Structures-2-Mod-23.jpg

Airplane

Instant-Massive-Structures-2-Mod-24.jpg

Boat (spawn it on the top block of the water you want to create it in)

Instant-Massive-Structures-2-Mod-25.jpg

AirBalloon

Instant-Massive-Structures-2-Mod-26.jpg

and much more?

How to install:

  • Download and install Minecraft Forge.
  • Download the mod.
  • Go to %appdata%.
  • Go to .minecraft/mods folder.
  • If the “mods” folder does not exist you can create one.
  • Drag and drop the downloaded jar (zip) file into it.
  • Enjoy the mod.

The post [1.12] Instant Massive Structures Mod Download appeared first on Minecraft Forum.

[1.12.1] Simple Sponge Mod Download

$
0
0

Simple Sponge Mod is a port of the 1.7.10 OpenBlocks Sponge. This mod simply adds an item and a block into 1.10.2+ Minecraft – Sponge on a Stick and Sponge!

Features

  • Configurable radius for both Sponges and Sponge on a Stick (3 by default, up to 64)
  • Configurable durability for Sponge on a Stick (256 by default, up to 2147483647)

Recipes

Since this mod is a port of the original OpenBlocks Sponge, recipes are the same.

You can install JEI to see the recipes.

Sponge (Shapeless):

Simple-Sponge-1.png

1x White Wool + 1x Any Slimeballs (Using “slimeball” OreDict)

Sponge on a Stick (Shaped):
Simple-Sponge-2.png

1x Sponge + 2x Any Sticks (Using “stickWood” OreDict)

1x Sponge + 2x Any Sticks (Using “stickWood” OreDict)

Magmatic Sponge (Shapeless):

1x Sponge + 1x Magma Cream

Magmatic Sponge on a Stick (Shaped):

1x Magmatic Sponge + 2x Any Sticks (Using “stickWood” OreDict)

Requires:

Minecraft Forge

The post [1.12.1] Simple Sponge Mod Download appeared first on Minecraft Forum.


[1.12.1] Corail Tombstone Mod Download

$
0
0

Corail Tombstone Mod allows to keep the dropped items in a grave when you die in a tombstone. When clicking the grave, it automatically equips your armor and returns back your lost items.

Corail-Tombstone.jpg

When you died, and if the option “access needed” is on, you’ll receive a grave’s key allowing you to know the path to your grave.

This key can be upgraded to be able to directly teleport to your grave.

You must be in survival mode, with rule keep Inventory set to false, and at least one item lost, to have a grave.

Corail-Tombstone-6.jpg

The decorative graves

Corail-Tombstone-1.jpg

Corail-Tombstone-2.jpgCorail-Tombstone-3.jpgCorail-Tombstone-4.jpgCorail-Tombstone-5.jpgCorail-Tombstone-7.jpg

The Recipes

The Simple Grave Recipe :
Corail-Tombstone-8.jpg

The Normal Grave Recipe :
Corail-Tombstone-9.jpg

The Cross Grave Recipe :
Corail-Tombstone-10.jpg

The Tombstone Recipe :
Corail-Tombstone-11.jpg

Upgrade Grave’s Key Recipe :
Corail-Tombstone-12.jpg

What does the config in game allows

  • set the xp lost
  • configure an access to the grave based on a grave’s key (the key disappears when grave doesn’t exist anymore)
  • set a decay time, allowing to access the grave without key (for anyone)
  • disable the fog effect and the highlight when holding the key
  • set the ingredient to upgrade the grave’s key
  • enable/disable teleport to others dimensions and upgrade of the key

Requires:

Minecraft Forge

The post [1.12.1] Corail Tombstone Mod Download appeared first on Minecraft Forum.

[1.12.1] VoidCraft Mod Download

$
0
0

VoidCraft Mod is our interpretation of what lurks deep within the one of Minecraft’s oldest, yet mostly untouched environments: The infinitely expansive Void.

VoidCraft.png

Features:

  • No plane in existence can escape being touched by the abyss that lies beneath their layer of bedrock… But despite it touching every world, entering it is no simple task. If anyone or anything tries to enter it from holes in bedrock, a destructive force will eat away at its material being. Though, if one could somehow survive falling through this violent barrier long enough, they might end up in the inner void. …Though making something that could withstand the void would probably take an exceedingly long time…
  • The easiest way to enter the void is to harvest Void Crystals from the Dimension closest to it: The End. Once there, one can search for Void Crystals bound to the native whitestone. Each ore will always drop 1 to 3 Void Crystals, regardless of one’s fortune. After gathering a large sum of Crystallized Void, combine nine of them together in a crafting table to form a Void Crystal Block. With these new blocks in hand, construct a portal frame and activate it by throwing Void into it from an Obsidian Flask. The Crystals will resonate with the void’s power, and create a portal that will safely transport matter into the inner void, bypassing the destructive protective layer that surrounds it.
  • After stepping through the portal, you’ll be in the Void, a black abyss where only powerful ethereal spirits can survive. All other creatures will slowly die in the hostile environment, including you. However, if you can brave the Void and infuse it’s ethereal essence with your tools, it could yield powerful results…

Getting Started:

You’ll want to get yourself the Void Vade Mecum. This book contains all the information you’ll need to know about the mod.

To get the Void Vade Mecum, you’ll need to collect an Obsidian Flask. To collect an Obsidian Flask you’ll need to craft an Empty Obsidian Flask with three Obsidian Blocks and a single Glass Block.

VoidCraft-4.png

To fill the Flasks you’ll need to head down to Y level 5 or below. Once you’re at or below this Y level, simply Right Click with an Empty Flask in hand. This will collect the nearby void into the special flasks.

Proceed to throw the flask in the world via Right Click to create Void Fire, from here you must toss a vanilla book into the fire. The Void Vade Mecum will now be in your possession.

VoidCraft-1.pngVoidCraft-2.pngVoidCraft-3.png

Requires:

Minecraft Forge

The post [1.12.1] VoidCraft Mod Download appeared first on Minecraft Forum.

[1.12.1] Cosmetic Wings Mod Download

$
0
0

Cosmetic Wings Mod adds cosmetic wings to Minecraft. Simply press the Y key (default can be rebound) to open the wing select screen. Wings can be moved and resized and some wings can also be recoloured. Note the wings are purely cosmetic and will not allow you to fly.

Cosmetic Wings Mod

cosmetic-wings-mod-2

How to install:

  • Download and install Minecraft Forge.
  • Download the mod.
  • Click on the Start Menu in Windows.
  • Type run into the search box, and select the Run program at the top of the results.
  • Type %appdata% into the Run program, and press Enter.
  • Go to .minecraft/mods folder.
  • Drag and drop the downloaded jar (zip) file into that.
  • Enjoy the mod.

The post [1.12.1] Cosmetic Wings Mod Download appeared first on Minecraft Forum.

[1.10.2] Faster Ladder Climbing Mod Download

$
0
0

Faster Ladder Climbing Mod allows you to climb up and down ladders faster by looking up or down while doing so. Originally part of the Quark Mod, extracted and updated for use as a small standalone mod.

Faster Ladder Climbing Mod

How to use:

Look straight down to go down the ladder faster. Look straight up to go up the ladder faster. Mod Options allow for increasing / decreasing how much faster you can go.

Requires:

Minecraft Forge

How to install:

  1. Make sure you have already installed Minecraft Forge.
  2. Locate the minecraft application folder.
    • On windows open Run from the start menu, type %appdata% and click Run.
    • On mac open finder, hold down ALT and click Go then Library in the top menu bar. Open the folder Application Support and look for Minecraft.
  3. Place the mod you have just downloaded (.jar file) into the Mods folder.
  4. When you launch Minecraft and click the mods button you should now see the mod is installed.

The post [1.10.2] Faster Ladder Climbing Mod Download appeared first on Minecraft Forum.

[1.11.2] Faster Ladder Climbing Mod Download

$
0
0

Faster Ladder Climbing Mod allows you to climb up and down ladders faster by looking up or down while doing so. Originally part of the Quark Mod, extracted and updated for use as a small standalone mod.

Faster Ladder Climbing Mod

How to use:

Look straight down to go down the ladder faster. Look straight up to go up the ladder faster. Mod Options allow for increasing / decreasing how much faster you can go.

Requires:

Minecraft Forge

How to install:

  1. Make sure you have already installed Minecraft Forge.
  2. Locate the minecraft application folder.
    • On windows open Run from the start menu, type %appdata% and click Run.
    • On mac open finder, hold down ALT and click Go then Library in the top menu bar. Open the folder Application Support and look for Minecraft.
  3. Place the mod you have just downloaded (.jar file) into the Mods folder.
  4. When you launch Minecraft and click the mods button you should now see the mod is installed.

The post [1.11.2] Faster Ladder Climbing Mod Download appeared first on Minecraft Forum.

Viewing all 7802 articles
Browse latest View live