The goal of Kitsu’s ForgeCraft Mod is to provide players with a special thing, Blacksmithing Mod as well as world experiences to use the tools and items. The mod adds forging of iron ore into ingots via the Crucible Method. Forging of tools is via anvil and hammer. Movement of hot items is through tools. A large portion of the interactive items and blocks are models and look great.
Kitsu’s ForgeCraft Mod also adds tool upgrading as well as custom weapons. The weapons are low vert-count models which look excellent in all perspectives.
Image may be NSFW. Clik here to view.Image may be NSFW. Clik here to view.Image may be NSFW. Clik here to view.Image may be NSFW. Clik here to view.Image may be NSFW. Clik here to view.Image may be NSFW. Clik here to view.Image may be NSFW. Clik here to view.Image may be NSFW. Clik here to view.Image may be NSFW. Clik here to view.Image may be NSFW. Clik here to view.Image may be NSFW. Clik here to view.Image may be NSFW. Clik here to view.Image may be NSFW. Clik here to view.Image may be NSFW. Clik here to view.
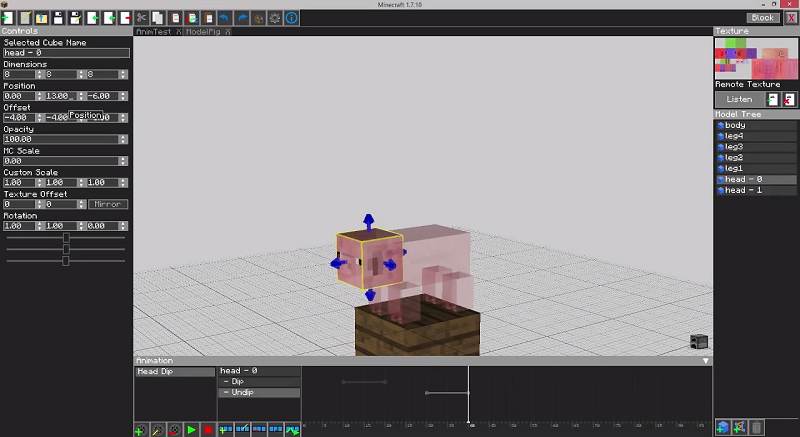
Tabula Mod is a truly amazing Minecraft Modeler that features a numerous of new things that can impress you. These are listed below.
Features:
Ingame Minecraft modeler. Hit the T button on your keyboard or the T button in the main menu to access. New in 4.1.0, works multiplayer as well, with the Wax Tablet!
Workspace folder within the /mods/ folder. Saves, textures, exports, configs, etc go here.
Function and UI based off Techne by ZeuX and r4wk. It’s meant to provide a replacement to Techne but not as a proper replacement for third party modelers such as Blender or Maya.
Has the ability to open Techne files. Supports Child models and has Undo/Redo save-states.
Keyboard shortcuts for New Project, Open Project, Delete, Cut, Copy, Paste, Paste in Place, Save, Undo, Redo.
Imports models from Minecraft directly, including mod models (on best attempt). Yes that is how the EnderDragon model really looks like.
Exports texture map of model and updated Java code for modders.
Animation support! Animate your models! Code export is not yet possible however.
Possibly upcoming 1.8 block model compatiblity.
Image may be NSFW. Clik here to view.Image may be NSFW. Clik here to view.Image may be NSFW. Clik here to view.Image may be NSFW. Clik here to view.
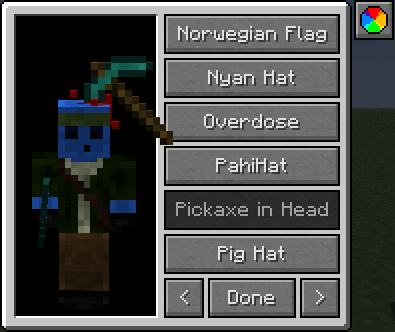
iChun’s Hats Mod adds an Aesthetic feature onto players, namely Hats!
This mod comes pre-packaged with 77 hats which will automatically get installed when the mod is run for the first time
How do you choose a hat? Simple! Hit H on your keyboard whilst in-game and a Hat Selector GUI will pop up. This GUI shows you all your currently installed hats and lets you choose one to wear.
Image may be NSFW. Clik here to view.
There’s also a colourizer option, allowing you to apply Minecraft’s colourizer on hats you wear. When you’ve decided on a hat, hit done and your hat will be displayed for everyone (on the modded server) to see.
Vanilla Immersion is an attractive mod that tries to bring an immersive experience to Vanilla Minecraft like the name suggests. This is achieved by removing any “pop-up” GUI from most blocks. Instead, you are able to directly interact with them from within the world, with your actual hands.
Image may be NSFW. Clik here to view.
Note: This is an early alpha release, expect issues ranging from lost items to hard crashes! Additionally, all immersive block variants are standalone blocks right now due to issues with MinecraftForge. Except for replacing the actual Vanilla blocks in the future, the replacement will be as seamless as possible and you won’t have to start a new world.
Features
Currently, the following set of blocks has received special treatment from this mod.
Crafting Table
Have you ever wondered what that grid on a crafting table is for? Exactly, you are supposed to craft on it; however, unfortunately, when you right click with any item on the correct slot of the grid, it will just open a window. How annoying!
Image may be NSFW. Clik here to view.
The Immersive Crafting Table has the following features:
Directly place items on the in-world crafting grid by right-clicking the appropriate slot
Left-clicking a slot (including the result) will remove the item it currently holds to your inventory
Sneaking while doing any click will perform the normal action, only with all items from a stack rather than only one of them
Full support for dragging, just like the Vanilla GUI
New: Integration with JEI
Automatic transfer of recipes available through clicking the question mark icon in the lower right-hand side corner
Limited support for automation through hoppers or other mods
Crafted items may be extracted from the bottom unless the recipe requires special player data
On the north, south, west and east side of the crafting table items may be inserted into the adjacent (“middle”) slots
Items may be inserted into the centre slot from the top face
Furnace
Like the crafting table, the furnace can now be interacted with directly in the world. In addition to that, you can actually see inside the furnace now, if you ever wondered what’s going in there when you smelt up those precious metals.
Image may be NSFW. Clik here to view.
The Immersive Furnace has the following features:
Directly insert items into the respective slot (upper half for input, lower half for fuel)
Visual indication of remaining fuel (coal will turn lighter, i.e. into ash)
Parity with Vanilla automation-wise
Inserting items works just the same
“Extracting” items will have to be done through a hopper in front of the furnace since it will drop all smelting results into the world
Anvil
In Vanilla, the anvil isn’t very impressive, just a collection of 4 grey cubes. With this mod, however, you can not only directly do your repairs in-world, you also get a nice preview of what you will receive as output.
Image may be NSFW. Clik here to view.
The Immersive Anvil has the following features:
Place inputs on the left side of the anvil
The object to be repaired/modified will go into the lower half
The modifier goes into the slot above
The result of the operation will be displayed translucently on the right-hand side of the anvil. Right click it to take it (will cost you XP, just like Vanilla)
Items can be named by right clicking the front face of the anvil and by typing text, it will directly be displayed
Enchantment Table
The Vanilla enchantment table has a fancy book floating above it, but it doesn’t do much expect floating and flipping its pages. How about actually seeing information about the available enchantments on there?
Image may be NSFW. Clik here to view.
The Immersive Enchantment Table has the following features:
Insert the item to enchant and potential modifiers (i.e. lapis lazuli) into the table by right clicking it with them
Enchantments can be selected from each page, flipping the page is simply done by clicking the “button” or the left/right margin of the page
Information about required experience, lapis lazuli and a guaranteed enchantment can be found among the cryptic text on each page
Walking too far away from the table will close the book (just like Vanilla) and remove all items inserted
Upon clicking “Enchant”, a process of about 6 seconds is started to perform the actual enchanting
Brewing Stand
In Vanilla, the Brewing Stand displays every potion you insert in the same way. This mod changes the look and feel completely.
Image may be NSFW. Clik here to view.
The Immersive Brewing Stand has the following features:
Insert/Extract potions/bottles into/from the stand by right clicking the corresponding “tubes” (your selection will be visible)
Insert/Extract the ingredient by right clicking the little “bowl” on top of the stand. Alternatively, drop the item on top of the bowl
Insert/Extract the fuel (i.e. blaze powder) by right clicking the “bowl” while it contains an ingredient
All automation capabilities from Vanilla are retained
Planned Features
Immersive versions of the remaining Vanilla blocks, excluding chests, hoppers, droppers and dispensers as well as potential Minecart forms of any block. The former is due to the fact that managing these large inventories would just be tedious, the latter is not set in stone, immersive entity variants are unlikely though
Integration with JEI
Full support of ‘R’, ‘U’ and other key combos while hovering over an item on the crafting table, the furnace or the anvil
Torch Arrows Mod allow you to light up areas from a distance. No longer will you need to build cobblestone towers or cut stairs into the sides of ravines to place torches in high up dark areas. Made similarly to regular arrows, but with a piece of coal or charcoal in place of the flint head, they are used like tipped arrows. Place a Torch Arrow in your offhand and light the way.
Torch Arrows Mod allow you to light up areas from a distance. No longer will you need to build cobblestone towers or cut stairs into the sides of ravines to place torches in high up dark areas. Made similarly to regular arrows, but with a piece of coal or charcoal in place of the flint head, they are used like tipped arrows. Place a Torch Arrow in your offhand and light the way.
Do you want to have more control of the way your tools look? You might like Silent’s Gems Mod
Image may be NSFW. Clik here to view.
Silent’s Gems Mod provides you with 32 new gemstones (12 in earlier versions) in the mod. These can be used to craft a variety of building blocks and more tools.
The tools are highly modular, and you can build a single tool out of multiple types of gems (and other things). Additionally, the stats of such a tool will depend on the parts used. After building a tool, it can be changed without changing the stats. Many higher tier tools also have special abilities that run on a type of energy called ‘Chaos’.
Other blocks and items of note include modular armor, lamps, teleporters (powered by Chaos), enchantment tokens (which allow enchanting without randomness, but costing valuable materials andthe torch bandolier (stores 1024 torches in a single slot).
Key Features
Tools: Craft a nearly limitless variety of swords, katanas, magic scepters, pickaxes, shovels, axes, and more!
Armor: Modular, like tools. Can be decorated (models WIP) and can provide more protection than diamond armor.
Blocks: Bricks, lamps, teleporters, and more!
Enchantment Tokens: Invest your resources to enchant tools, instead of XP! They should work with most other mods.
Chaos Gems: Somewhat like reusable potions, but you can also use them to fly! (May or may not return in Gems 2)
Return Home Charm: Return to a set point from anywhere, even across dimensions!
Tools and Armor
Tools and armor can be made of the 32 gems you can find in the world, plus the “supercharged” gems that you can craft, flint, and even more materials if using add-ons. Each material creates items with different durability, mining speed, melee and magic damage, protection and toughness (armor), and enchantability. You can also craft tools and armor with more than one type of material — simply swap out parts in the recipe for different ones! After being crafted, tools and armor can be “decorated” by crafting them with additional materials. This changes their appearance only, not their stats.
Types
Silent’s Gems includes a variety of tools: everything from vanilla and more!
Swords – Mostly like vanilla, but super-tier swords have a magic attack.
Katanas – Faster than swords, but less melee damage and more magic damage. Super-tier only. Less durability than most tools.
Scepters – Much slower than swords, low melee damage, but high magic damage. Super-tier only. Less durability than most tools.
Tomahawks – Throwing axes. Low melee damage, but a thrown tomahawk can deal a devastating amount of damage, especially if it hits the target’s head. They are somewhat effective at chopping wood.
Pickaxes – Similar to vanilla pickaxes, but they work on more materials like glass. They have the Area Miner super skill.
Shovels – Mostly identical to vanilla shovels. They have the Area Miner super skill. Repairs are more effective.
Axes – Similar to vanilla axes, but they can also break leaves quickly. They have the Lumberjack super skill.
Hoes – Identical to vanilla hoes, but fancier looking.
Sickles – Capable of clearing plants from a large area with a single swing! They can also harvest crops without breaking the plant.
Paxels – A pickaxe, shovel, and axe all-in-one. It can mine basically anything, but is a bit slower than other tools due to its large size. It takes six materials to craft. Repairs are also less effective, but paxels get some extra durability as well. Super-tier only with Area Miner.
Crafting
You should install a mod to view recipe in-game, such as JEI. I won’t give exact recipes here.
Tools are made as you would expect, except that super-tier (supercharged) tools require higher tier rods instead of sticks/bones. In the base mod, you can use iron rods and ornate gold and silver rods. All rods must match when crafting a tool. Any item that can serve as a rod will have extra info added to its tooltip, including the compatible tool tiers.
Armor is crafted differently. You must craft an armor frame, then place four materials (gems, etc.) into the adjacent slots. The tier of the frame must match the materials. Frames are crafted from armor lattice. The lattice is laid out in the same shape as vanilla armor recipes to craft the frames. Again, the lattice tier must match that of the frame you intend to craft.
Super Skills
Many super-tier tools have natural special abilities. Currently, these all require some input from the user to activate
Magic Attacks – All super-tier “swords” (including katanas and scepters) have this ability. To fire, swing the weapon while sneaking. Currently, the system is far from complete. You will eventually be able to customize the attack, but for now it just depends on the sword type. Regular swords fire a gravity-affected projectile that bounces. Katanas fire three shots that trace the ground, damaging anything in there path. Scepters fire five homing shots that target a random nearby entity.
Area Miner – Previously an enchantment. This allows super-tier pickaxes and shovels to mine a 3×3 area. Use the “Toggle Special” keybinding (default C) to toggle for each tool.
Lumberjack – Previously an enchantment. Trees will fear you, as you can fell them by mining a single block! Use the “Toggle Special” keybinding (default C) to toggle for each tool.
Right-click to place
If you have a block in the slot after a pickaxe, shovel, or axe, you can right-click with your tool to place it. This also works with the Torch Bandolier. If that slot is not a placeable item, it will check the last slot of your hotbar instead. You can disable or tweak this feature in the config.
Decorating
Place a tool or piece of armor in a crafting grid.
Then place materials in slots adjacent to it. This will exchange part of the tool/armor with that material, changing its appearance. You can also place a block of wool in any slot to add a cosmetic grip on the tool rod (does not work on armor). Decorating a tool or armor also repairs it, making it a good way to keep your best items alive! Flint can also be used for decorating, but will only repair flint tools/armor! Use glass to restore a part to its original state. Decorating can also repair a broken tool.
Image may be NSFW. Clik here to view.
Statistics
All tools and armor will track various things as they are used, such as the number of blocks you’ve mined/placed with them, how many times you’ve struck monsters with them, etc. Hover over the item and hold Ctrlto view its statistics.
Mixed-Material Tools and Armor
All the parts of a tool or piece of armor need not be the exact same item. As long as they are the same tier, you can mix materials. This will average out the stats of the parts, but also gives a “variety bonus”. The variety bonus is small, so it may not always give better stats. Experiment to see what works!
Image may be NSFW. Clik here to view.
In this example, the Black Diamond makes up for Lepidolite’s low durability, at the cost of some magic damage.
Tool Parts
Tool parts refers to items that can be used to craft tools and armor. This includes gems, for example. If using Extra Parts, many common ingots are as well. Technically, tool rods are also parts, and each part has a ‘tier’ assigned to it. When crafting a tool or armor, the tier of each part must match. The tier of the tool is also determined by the parts it was crafted with. Decorating with parts of a different tier will work, but may not repair the tool. Tool parts will also have information added to their tooltips, such as their tier and stats.
Tiers
Mundane: Common materials, like flint.
Regular: Uncommon materials, like gems.
Super: Rare materials, like supercharged gems, which must be crafted.
Grades
Many tool parts can also be graded in the Material Grader. This will assign a random grade (or ranking) to the part. Possible grades (lowest to highest) are: E, D, C, B, A, S, SS, SSS, with ‘B’ being the most common. Grades are normally distributed, meaning both high and low grades are less common.
Material Grader
As stated above, the Material Graded grades tool parts. It requires Chaos to function (see the section on Chaos further down the page), meaning it should be placed near Nodes or Pylons. Items can be piped into the top or sides and out the bottom.
Tool Upgrades
Tool upgrades are additional things you can apply to tools that are not enchantments or cosmetic changes.
Tipped Upgrades
These change the harvest (or mining) level of the tool and boosts its durability. For example, apply an iron-tipped upgrade to a flint pickaxe to mine gems, diamonds, etc. Apply a diamond-tipped upgrade to mine chaos ore and obsidian. You can completely bypass vanilla tools!
No Glint
Removes the “enchanted glow” from a tool. Apply again to reverse the change. (This is not in 1.9+!The enchanted glow was removed from all Gems tools because of a rendering bug.)
Enchantment Tokens
Tired of making mob grinders and hoping you’ll get the enchantments you want? Why not just invest your mineral assets into enchanting instead? With enchantment tokens, you can have exactly what you want, for the right price! They should also work with tools from most other mods (no, they don’t work with Tinker’s Construct!) Of course, you can still use enchantment tables if you like.
How to use: Craft the enchantment tokens you want (you’ll get one level of the enchantment per token), then craft the tokens with a tool. You can craft multiple tokens with a tool at one time, just put one token in each slot. Normal enchanting rules apply.
Image may be NSFW. Clik here to view.
Keep in mind that enchantment tables won’t work on something that is already enchanted, but tokens will.
Chaos Gems
Currently not in 1.9! I’m leaving this info here for players of earlier versions!
Somewhat like reusable potions, but they can also be used to fly! You can have up to three effects on a single gem, by default. While active, they will drain their charge and apply the appropriate effects. If they run out of charge, they will be disabled, removing any effects immediately.
How to use: Craft a Chaos Gem with Chaos Runes to give it effects, one rune per level. They can be activated by either right-clicking with them in your hand, or pressing a key (check your keybindings). Chaos Gems were overhauled in 1.3.00-beta03, see below for version specific info.
For versions 1.3.00+: Chaos gems must be charged in a Chaos Altar. They will no longer regenerate charge on their own, unless crafted with Mini Pylons. Capacity and Booster runes no longer exist. Their max capacity is locked at one million units. Higher levels of effects will add to the charge drain, an extra 20% per level above 1. Flight is highly reliable and has no known bugs.
For versions 1.2.07 and lower: Chaos gems will recharge by themselves. The recharge rate can be improved using Booster runes, and the total charge can be improved using Capacity runes. Higher levels of effects do not impact charge drain. Flight is usable, but has many bugs, making it very unreliable.
Teleporters
Want to get around faster? Silent’s Gems has some modestly priced teleporters to use! As of version 1.3.00, there are three kinds: regular, redstone, and anchors. These teleporters are somewhat “dumb”. They don’t actually care if another teleporter exists at the destination, but you need two teleporters to set the destination. Recipes can be disabled in the config file.
How to use
Place any combination of teleporters you wish (even anchors). Use a Teleporter Linker to connect pairs. You can link any of the three types together however you wish! Note that there are no actual “links” between the teleporters. The linker merely tells the teleporters where to send things. Try using anchors to establish one-way connections.
Cost
In Silent’s Gems 2, teleporters require Chaos to run. They can draw it directly from the player, or can be powered by nodes or pylons. Earlier versions of the mod require XP. Short distances are free, longer distances require linearly increasing amounts of XP, and traveling between dimensions has a flat cost.
Types
Regular – Can teleport players that right-click on them.
Redstone – In addition to the functions of the regular teleporters, these can be triggered by a redstone pulse. They can also teleport non-player entities! Teleporting non-player entities across dimensions is currently a bit broken, I don’t recommend it.
Anchors – Not capable of teleporting anything, but the other teleporter types can link to it. Also much cheaper!
Chaos
Chaos is a magic energy produced by Nodes and Pylons. The player has a small internal buffer of Chaos. To hold more, you’ll need a Chaos Orb. The Altar can store Chaos and charge items.
Chaos Nodes
An early way of gettings Chaos. These blocks spawn naturally in the world. They don’t produce much, and send it infrequently. Nodes do have an interesting property however: they send a variety of “packets”, not just Chaos packets. These packets do different things, including repairing damaged items and attacking hostile mobs.
One disadvantage of Nodes is that they aren’t easy to move. They can’t be broken; you need an expensive Node Mover item instead. Still, building your starter house near a Node could be useful.
Chaos Pylons
A faster way to get Chaos than Nodes. They can be crafted and placed anywhere you need them. They send Chaos in “packets” just like Nodes. But they ONLY send Chaos packets, none of the special ones that Nodes do.
Chaos Orbs
The player’s internal Chaos storage is a bit limited. To do much with it, you will need to carry a Chaos Orb with you. Chaos Orbs will automatically accept Chaos from any source the player can, such as Nodes or Pylons. In other words, stand near a Node or Pylon. You can also charge Orbs in an Altar.
The different tiers of Chaos Orbs vary in more than capacity. Many have a chance of taking damage and eventually breaking when Chaos is drained from them when they are low on charge. If possible, keep your Orbs above half charge to avoid damaging them.
Chaos Altar
The Chaos Altar can accept Chaos from nearby Nodes and Pylons. It will store a fairly large amount. Place items that can store Chaos in the Altar to charge them without needing to stand near a Chaos source.
Glow Roses
Glow Roses are light-emitting flowers that spawn naturally throughout the world. Their light is enough to prevent mob spawns just two blocks away. Spawn rates are configurable.
Chaos Flower Pot
Glow Roses can’t be planted in normal flower pots, but the Chaos Flower Pot is designed to hold them. Not only that, it greatly amplifies the light of the Glow Rose! A potted Glow Rose will also place phantom light blocks a good distance away, lighting up a large area. Note that your game may slow down a bit after placing a Chaos Flower Pot, but should return to normal in less than a minute.
Enchantments
None of these enchantments exist in Silent’s Gems 2! They’ve either been made obsolete or were changed into something else.
This mod adds a couple of enchantments. You can get them through enchantment tokens, or the enchanting table!
Mending – Randomly repairs the tool/armor a bit from time to time. Works with tools/armor from other mods! More effective at higher elevations. (Gems 2: removed because of vanilla’s Mending enchantment)
Area Miner – Lets tools mine a 3×3 area, but cuts their speed to 20%. Restricted to gem tools. (Gems 2: This is now a natural, toggle-able ability of super-tier pickaxes and shovels)
Lumberjack – Lets an axe chop down an entire tree at once! It will work like a regular axe if it doesn’t detect a tree (wood with leaves on it). Speed reduced to 10% when felling a tree. Conflicts with Area Miner, restricted to gem tools. (Gems 2: This is now a natural, toggle-able ability of super-tier axes)
Life Steal – The user is healed for a small fraction of the damage they deal. (Gems 2: Not implemented)
Other Useful Items
Return Home Charm – Right-click on a teleporter (anchors are fine) to bind it to that point. To teleport, hold right-click for a certain amount of time (24 ticks by default), then release! In Gems 2, it requires Chaos to function. Earlier versions use durability.
Torch Bandolier – It stores 1024 torches. Because I like caving. Right-click to place torches. Place in a crafting grid to extract a stack of torches. It absorbs torches from your inventory on its own.
Summon Kitty/Summon Puppy – Spawns a tamed cat/dog. You can also name it in an anvil, just like spawn eggs.
Fluffy Puffs – A cotton-like plant used to craft soft things. Get the seeds by breaking tall grass, just like wheat seeds. Plant them to grow fluffy puffs, then use them to craft wool, string, feathers, fluffy fabric, or fluffy blocks.
Fluffy Blocks will reduce/negate fall damage when you land on them, depending on how many are stacked below the topmost.
Requires:
Silent Lib (Make sure to download the latest version!! You will crash if using an older version) Minecraft Forge
Temple to create a bridge between the dimensions, smaller dungeons
Image may be NSFW. Clik here to view.
Info:
Cobaltore can be found at level 10
The spawnrate of the temple is changeable in the config(low number means more temples and high mean less. Like a difficulty)
You should have atleast a iron armor or better(diamond, cobalt), when you go in the dimension or near the temple
The portal can be lit with the fireshard
Monster/Mob:
Cobaltzombie
Monster: yes
Health: 35
Damage: 4
Armor: 3
Speed: 1.0 (double speed of a zombie)
Loot: CobaltNugget
Image may be NSFW. Clik here to view.
Cobaltguardian
Monster: yes
Boss: yes
Health: 360
Damage: 10
Armor 10
Speed: 0.4 (little less than a zombie)
Immunity against fire/lava
BlueBuddy
Mob: yes
Health: 7.5
Damage: 0
Armor: 0
Speed: 1.0/3.0 if it gets hurt
Loot: Blueberry
Image may be NSFW. Clik here to view.
BlueSlime
Mob: yes
Health: Varries(Vanilla Slime)
Damage: (Vanilla Slime)
Armor: (Vanilla Slime)
Speed: jumping
Loot: Blue Slimeball
Image may be NSFW. Clik here to view.
Cobaltguardian Minion
Monster: yes
Health: 25
Damage: 3
Armor: 0
Speed: 0.4
Image may be NSFW. Clik here to view.
Recipes:
Image may be NSFW. Clik here to view.Image may be NSFW. Clik here to view.Image may be NSFW. Clik here to view.Image may be NSFW. Clik here to view.Image may be NSFW. Clik here to view.Image may be NSFW. Clik here to view.Image may be NSFW. Clik here to view.Image may be NSFW. Clik here to view.Image may be NSFW. Clik here to view.Image may be NSFW. Clik here to view.
Image may be NSFW. Clik here to view.Image may be NSFW. Clik here to view.Image may be NSFW. Clik here to view.Image may be NSFW. Clik here to view.
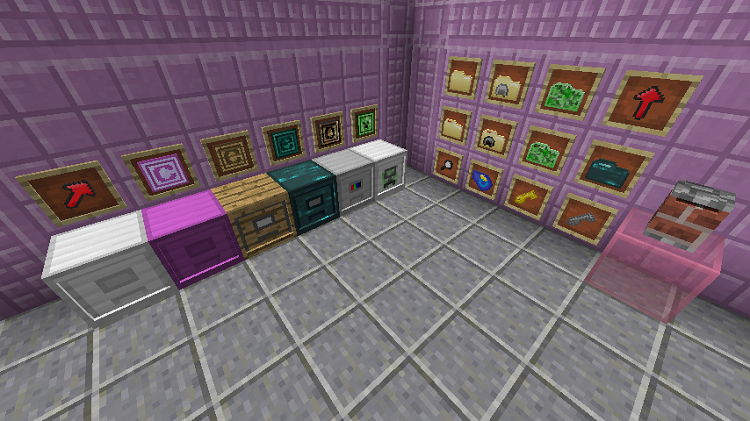
Real Filing Cabinet Mod is a storage mod with a variety of usefulness and resourcefulness. Unlike many other storage mods, it does not offer a solution to storing many different things. But what it can storewill be able to store a large amount to the point of limitless storage.
Image may be NSFW. Clik here to view.
The Filing Cabinet:
The filing cabinet block itself is simple to make. It has 8 inventory slots to store things in, but they accept only filing folders that have things inside of them. You can open and close the cabinet with an empty hand. Right-clicking with a (non empty) folder will store it in the filing cabinet. Shift-right clicking an open cabinet with an empty hand will take a folder out of it.
The filing cabinet can be broken with any pickaxe, and it will keep its contents. You can carry it around portals, and also any existing upgrades on them will drop as a separate item.
A filing cabinet will only accept filing folders when it is opened. You can insert valid items/blocks into the cabinet at any time as long as it is holding a folder that accepts that item. Item extraction from a filing cabinet is possible by adding a filter onto it via item frame above the block facing the same way. If you know your JABBA and Storage Drawers, you know how to store and retrieve items. Automation will follow the rules of this filter too. Item Filter setup is below:
Item Filter:
Image may be NSFW. Clik here to view.
By setting it up this way, you can make item extractions possible, manually and automatically. You make sure the item frame is facing the same direction as the filing cabinet is. An empty item frame means nothing will be extracted from the cabinet at all.
The Basic Items:
Magnifying Glass will show you the contents of a filing cabinet containing filing folders. It is also useful for removing upgrades with. If you have WAILA or The One Probe installed, you can use those to display the contents instead and disable that function for the magnifying glass in config.
Whiteout Tape will wipe the information from a folder that contains 0 items or blocks, emptying them for re-use.
Master Key is used to lock your filing cabinets with. Other players will be unable to extract/insert or open/close your filing cabinets.
Key Copy: Right-clicking your locked filing cabinets with this will create a “copy” of your master key. Giving this key to other players will let them modify your filing cabinets as long as they have it in their inventory. They still cannot unlock your filing cabinets like the Master Key can.
Filter: An arrow shaped item you can place in an item frame above your filing cabinets. Depending on the item’s rotation in the frame, it will let you extract from the slot it is “pointing” at. Default rotation will point at slot 0 if it’s pointing straight down, slot 4.
The Filing Folders:
When being the heart of the mod, folders enables you to carry around or store in the cabinets themselves. They are able to carry more items or blocks than you will practically need. There are 3 different folders you can craft that have different functions:
Filing Folder: This is a normal filing folder. It will only accept items and blocks that can stack together. Items that can be damaged/repaired cannot be accepted into it. That it shapelessly crafts the empty folder with an item/block to return a filing folder can be stored in a filing cabinet.
Durability Folder: This is the opposite of the previous folder. It can store items that can be damaged/repaired. So armor/tools/weapons can be stored in it. It shapelessly crafts an undamaged item with the durability folder. After that, it can accept damaged items of the same type into it. Any more damaged items that go into the folder will merge with the other damaged items, repairing it as if it was shapelessly repaired in the vanilla crafting window.
Mob Folder: After crafting the empty mob folder, right-clicking any non-boss/non-child mob with it will draw them into the folder creating a new mob storage folder. Clicking again on a block will release that mob.
The Upgrades:
Even a filing cabinet without a practical storage limit can have upgrades too! Rightclicking a cabinet while holding an upgrade will set them to that upgrade. Remove an upgrade from the filing cabinet by shift+leftclicking it with a Magnifying Glass. Filing cabinets that already have an upgrade will not accept another, with one exception. Here are some of their abilities:
Creative Upgrade: Obtainable only in creative mode. Allows for infinite item extraction from any folder stored in it. This is the only upgrade that can be applied to any filing cabinet that do or do not have an upgrade already applied.
Crafting Upgrade: Setting this upgrade will make the cabinet try to autocraft an item that is in the Item Filter. The crafting ingredients to autocraft an item must be provided by the folders that contain those ingredients.
Ender Upgrade: Is functionally the same as a normal filing cabinet, with one difference: Once applied, you cannot modify the contents of the filing cabinet (until you remove the upgrade to be able to do so again). Any folders you take out of the filing cabinet are simply copies of it, and what that folder copy can do is keep its contents synced with the filing cabinet it was taken from.
OreDict Upgrade: Gives the filing cabinet oredictionary capabilities once applied. A folder containing Oak Wood will accept Spruce Planks, and Tin ingots from a mod will accept Tin ingots from another mod, and so on. This can work the other way, using the Item Filter.
Mob Upgrade: Applying this to a filing folder will have it behave differently depending on what mob is colliding with it. If a mob collides with the filing cabinet and it contains a Mob Folder that can store that mob, the mob will disappear, being sucked into the folder automatically. This upgrade does not do anything different for folders that aren’t Mob Folders.
Fluid Upgrade: Apply this to a filing cabinet to make it behave as if it were a fluid tank, allowing the piping of fluids in and out of the cabinet. The extraction filter setup is similar to the setup for items: Just put a bucket with a fluid in it in the item frame to set the filter to only extract that fluid when it is present. To extract manually, hit the filing cabinet with an empty bucket, and it’ll try to fill that bucket with the fluid.
Image may be NSFW. Clik here to view.
Life Upgrade: Apply this upgrade to a filing cabinet and it shall sprout arms and feet. Its default behavior will have it try to collect nearby dropped items if it can store them. By applying either the Mob Upgrade or the Fluid Upgrade to the filing cabinet entity, it will then try to collect either mobs or fluids if it can store them, respectively. To remove an upgrade from it, smack it with a magnifying glass while crouching. To turn it back into a regular filing cabinet, smack it the same way when it has no upgrades. When this filing cabinet mob is created, it has a home point it will try to move back to if it wanders too far away. If you locked the cabinet beforehand, you will become that home point, and it will follow you!
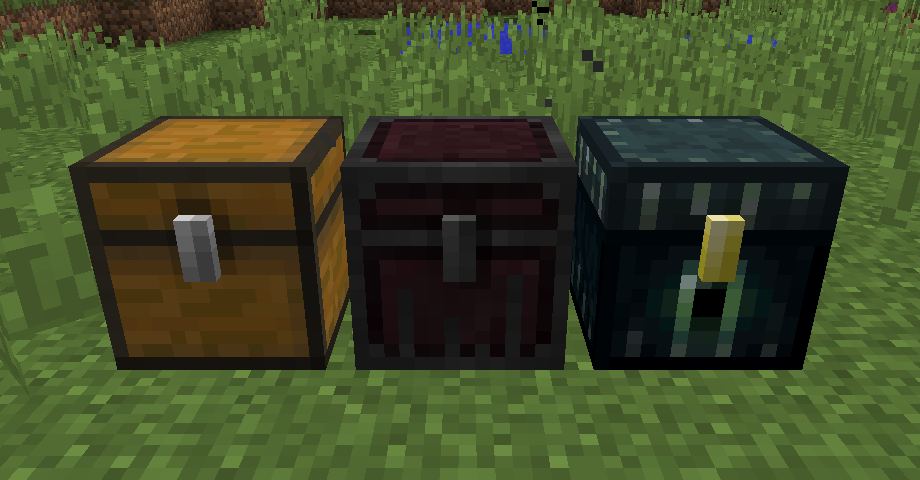
Nether Chest Mod adds one block: the nether chest. It serves a counterpart to the ender chest, having a special ability based on the nether dimension.
Image may be NSFW. Clik here to view.
When items are stored in nether chest, their normal stack size limit is multiplied by 8 due to the way the nether compresses space by a factor of 8. This stack size increase also applies to tools and any other items that aren’t normally stackable. The downside to these chests, however, is that they cannot be accessed by hoppers or other forms of automation. Additionally, trying to open one in the nether is a very bad idea.
Config Options
There are a few config options for the mod, which I figured I’d mention here so you don’t have to install it and run the game to see what options there are.
Text size of the item count of stacks stored in nether chests
By default, this is set to 75% to make room for numbers up to 512, however if you don’t like that, it can be configured to any number between 0.5 and 1.0
Explosion strength from nether chests that are opened in the nether
You can’t turn off the explosions, sorry, but you can turn their strength down to 1, which is 1/3 the strength of a creeper, or you can turn it up as high as 64, which is over 10 times as strong as a charged creeper
Central recipe ingredient
Unless you use CraftTweaker, the recipe for a nether chest will always require 4 nether brick blocks and 4 iron ingots, but you can use this config option to change the middle ingredient to any item in the game (although it isn’t damage or nbt sensitive). The default for this is blaze powder.
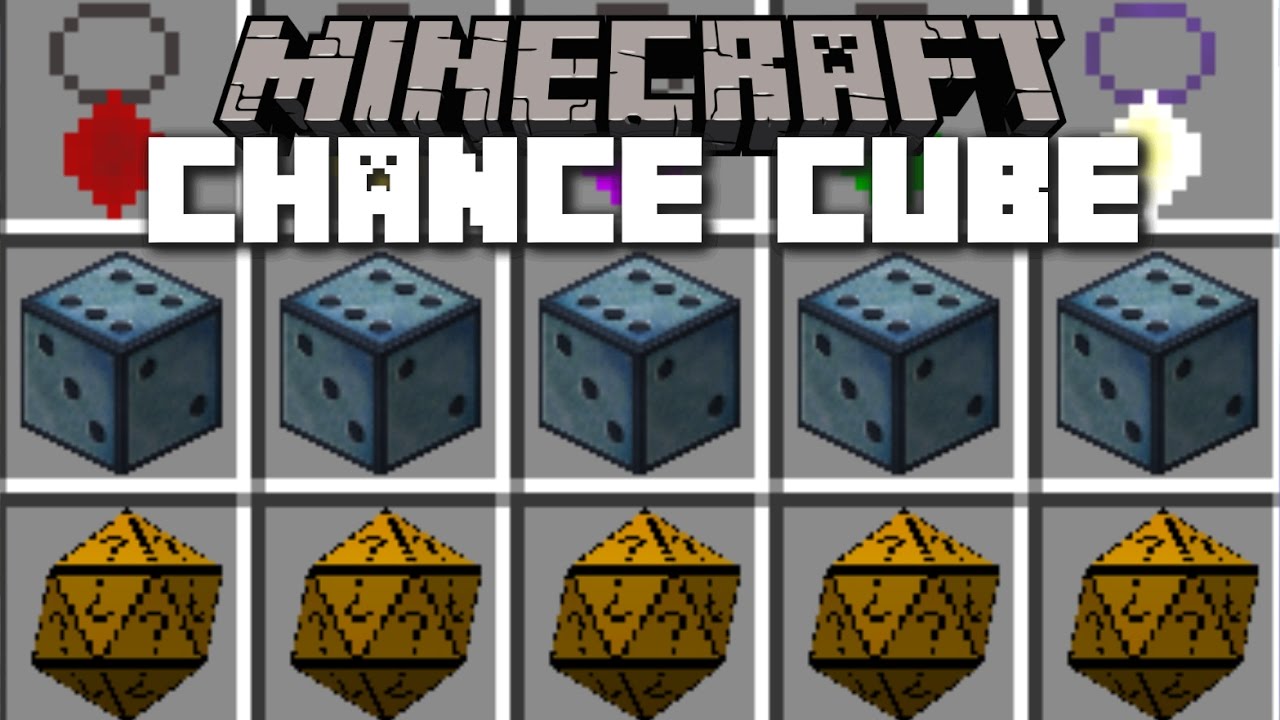
Chance Cubes Mod is a Lucky Block alternative mod. Explore your world and open these mystical blocks to obtain random rewards. Some rewards are helpful while other can be devastating. From rewards that spawn in hordes of zombies and death traps, to one tbat build full houses and provide next level items, each reward has its own unique twist to make the feel special.
Image may be NSFW. Clik here to view.
This mod is a simple random block mod. It not only provides you with a craftable chance block but also gives you pendants and items to help increase or randomize the luck of these blocks. The Chance Cube is a block added by Chance Cubes. They generate randomly around the world on the surface and emit light. A random effect will occur when the Cube is broken.
Statues Mod extends the idea of the open blocks statues.
Image may be NSFW. Clik here to view.
Mobs
Image may be NSFW. Clik here to view.
Items
Statue Core Image may be NSFW. Clik here to view.
Food
Royal Nugget Image may be NSFW. Clik here to view.
Saturation: 0.1 Hunger: 2
Crafting Recipes
Tier one Image may be NSFW. Clik here to view.
Tier two Image may be NSFW. Clik here to view.
Tier three Image may be NSFW. Clik here to view.
Tier four Image may be NSFW. Clik here to view.
Note any color of wool can be used for any statue
Statues
Tier one: Decorative only
Baby Zombie Statue*
Blaze Statue
Chicken statue*
Cow statue
Creeper Statue
Mooshroom Statue
Pig Statue
Rabbit Statue
Sheared Sheep Statue
Sheep statue
Slime Statue
SnowGolem Statue
Tier two: Musical
Baby Zombie Statue: Makes Zombie sounds when interacted with.
Blaze Statue: Makes Blaze sounds when interacted with.
Chicken statue: Makes Chicken sounds when interacted with.
Cow statue: Makes Cow sounds when interacted with.
Creeper Statue: Makes Creeper sounds when interacted with.
Mooshroom Statue: Makes Cow sounds when interacted with.
Pig Statue: Makes Pig sounds when interacted with.
Rabbit Statue: Makes Rabbit sounds when interacted with.
Sheared Sheep Statue: Makes Sheep sounds when interacted with.
Sheep statue: Makes Sheep sounds when interacted with.
Slime Statue: Makes Slime sounds when interacted with.
SnowGolem Statue: Makes snow sounds when interacted with.
Tier three: Musical and Functional
Baby Zombie Statue: Makes Zombie sounds and gives Rotten Flesh when interacted with.
Blaze Statue: Makes Blaze sounds and gives Blazerods when interacted with.
Chicken statue: Makes Chicken sounds and gives eggs and feathers when interacted with.
Cow statue: Makes Cow sounds and when right clicked with a bucket gives milk.
Creeper Statue: Makes creeper sounds and gives gunpowder when interacted with, and a nasty surprise too.
Mooshroom Statue: Makes Cow sounds and when right clicked with an empty bowl gives mushroom stew.
Pig Statue: Makes pig sounds and gives porkchops when interacted with.
Rabbit Statue: Makes rabbit sounds and gives rabbit hide, raw rabbit and rabbit’s foot when interacted with.
Sheared Sheep Statue: Makes Sheep sounds and gives mutton when interacted with.
Sheep statue: Makes Sheep sounds and gives the appropriate color of wool when interacted with. (note as of version 0.7 there is only a white version, this will change soon).
Slime Statue: Makes Slime sounds and gives slimeballs when interacted with.
SnowGolem Statue: Makes SnowGolem sounds and gives snowballs and pumpkins when interacted with.
Tier four: Functional
Baby Zombie Statue: Gives Rotten Flesh when interacted with.
Blaze Statue: Gives Blazerods when interacted with.
Chicken statue: gives feathers and eggs when interacted with.
Cow statue: When Right clicking with an empty bucket it fills the bucket with milk.
Creeper Statue: Gives Gunpowder when interacted with, may or may not spawn a creeper with a short fuse. Image may be NSFW. Clik here to view.
Mooshroom Statue: When right clicking with an empty bowls gives you mushroom stew.
Pig Statue: gives Porkchop when interacted with.
Rabbit Statue: Gives raw rabbit and Rabbit hide when interacted with, and a low chance for a rabbit’s foot.
Sheared Sheep Statue: Gives Mutton when interacted with.
Sheep statue: Gives Mutton and the appropriate color of wool when interacted with.
(note as of version 0.7 there is only a white version, this will change soon).
Slime Statue: Gives slimeballs when interacted with.
SnowGolem Statue: Gives Snowballs and Rarely a pumpkin when interacted with.
Eastereggs and how to get them
Tier one: Decorative only
Flood statue
King Cluck Statue
Tier two: Musical
Flood statue: Makes Zombie sounds when interacted with.(note this will change soon)
King Cluck Statue: Makes Royal Chicken sounds, sounds like normal chickens.
Tier three: musical and functional
Flood statue: Makes Zombie sounds and shoots fireworks when interacted with.(note the sounds will change soon)
King Cluck Statue: Makes Chicken sounds and gives Royal nuggets and old nugets when interacted with.
Tier four: functional
Flood statue: Shoots Fireworks when interacted with.
King Cluck Statue: Gives Royal Nuggets and rarely Gold Nuggets when interacted with.
Why are they an Easteregg?
Flood statue: Reference From Mindcracker Docm77 Season 4 Base where he flooded the perimiter for his witchfarm, a baby zombie tracked a villager through a maze as a part from a rube goldenberg machine.
King Cluck Statue: Reference From Former Mindcracker BTC King Cluck shop in Mindcrack season 4
How to get them: No spoilers just clues
Flood statue: Place a Baby zombie statue on a block that appears to be water.
King Cluck Statue: Chickens are not royals, prove me wrong by placing them on a shiny block.
How to get them: be warned this one contains spoilers
Flood statue: Place a Baby Zombie Statue (tier one) Statue on a Lapis block
King Cluck Statue: Place a Chicken Statue (tier one) on a Gold Block
Image may be NSFW. Clik here to view.Image may be NSFW. Clik here to view.Image may be NSFW. Clik here to view.Image may be NSFW. Clik here to view.
Inventory Tweaks Mod allows you to easily manage your inventories and chests. It works out of the box, and will make you gain a massive amount of time, both in singleplayer and multiplayer!
Image may be NSFW. Clik here to view.
A lot of effort has been put to make it as customizable as possible, without being annoying to set up.
If you’re ever frustrated in having to go back to your inventory just to swap in a new pickaxe this mod will help alleviate the stress. It’s simple in that it cuts out that need to grab a fresh tool and will automatically replace your spent tool with a new one in your inventory. All you need to remember is to keep stock of good tools in your pack.
What’s this mod about?
This client mod allows you to easily manage your inventory, in both single player and multiplayer. It works out of the box, and will make you gain a massive amount of time!
Image may be NSFW. Clik here to view.
Features:
It automatically replaces your tools as they break, and item stacks once emptied
It sorts your inventory and your chests in a single click/keystroke
It provides lots of powerful shortcuts to move items around
It allows you to customize entirely the way your inventory is sorted, thanks to clever configuration files
How to use:
Basic use
Just start playing Minecraft, you can already use most features of the mod. Notice the ”…” button that just appeared on the top-right corner of your inventory? This leads to the mod settings screen, if it’s there it means that the mod is installed correctly.
Inventory sorting
Trigger the sorting in your inventory by using the middle click, or by pressing R (by default), at any time. If you want to change the shortcut, you can do that from the ”…” menu in your inventory.
Tip: The middle click shortcut behaves differently if you target the crafting input: in that case, it will adjust the item amounts to balance them, helping optimize your recipe input. For example, if you want to make sticks, it will make sure your wood will be split equally between the top and the bottom stack.
Chests sorting
When you open a chest, you will see three additional buttons on the higher part of the screen. They allow to sort items in different ways ; but you can also use the middle click if you prefer (click several times to switch the sorting method).
Auto-refill
If you eat an item, break a tool or empty a stack by placing blocks, the mod will automatically fetch if possible a similar item from your inventory.
Note:
Click on the ”…” button from your inventory to explore the features (yay, inventory shortcuts!) and customize the settings of the mod.
You don’t even have to be in your inventory to use the R shortcut.
Statues Mod extends the idea of the open blocks statues.
Image may be NSFW. Clik here to view.
Mobs
Image may be NSFW. Clik here to view.
Items
Statue Core Image may be NSFW. Clik here to view.
Food
Royal Nugget Image may be NSFW. Clik here to view.
Saturation: 0.1 Hunger: 2
Crafting Recipes
Tier one Image may be NSFW. Clik here to view.
Tier two Image may be NSFW. Clik here to view.
Tier three Image may be NSFW. Clik here to view.
Tier four Image may be NSFW. Clik here to view.
Note any color of wool can be used for any statue
Statues
Tier one: Decorative only
Baby Zombie Statue*
Blaze Statue
Chicken statue*
Cow statue
Creeper Statue
Mooshroom Statue
Pig Statue
Rabbit Statue
Sheared Sheep Statue
Sheep statue
Slime Statue
SnowGolem Statue
Tier two: Musical
Baby Zombie Statue: Makes Zombie sounds when interacted with.
Blaze Statue: Makes Blaze sounds when interacted with.
Chicken statue: Makes Chicken sounds when interacted with.
Cow statue: Makes Cow sounds when interacted with.
Creeper Statue: Makes Creeper sounds when interacted with.
Mooshroom Statue: Makes Cow sounds when interacted with.
Pig Statue: Makes Pig sounds when interacted with.
Rabbit Statue: Makes Rabbit sounds when interacted with.
Sheared Sheep Statue: Makes Sheep sounds when interacted with.
Sheep statue: Makes Sheep sounds when interacted with.
Slime Statue: Makes Slime sounds when interacted with.
SnowGolem Statue: Makes snow sounds when interacted with.
Tier three: Musical and Functional
Baby Zombie Statue: Makes Zombie sounds and gives Rotten Flesh when interacted with.
Blaze Statue: Makes Blaze sounds and gives Blazerods when interacted with.
Chicken statue: Makes Chicken sounds and gives eggs and feathers when interacted with.
Cow statue: Makes Cow sounds and when right clicked with a bucket gives milk.
Creeper Statue: Makes creeper sounds and gives gunpowder when interacted with, and a nasty surprise too.
Mooshroom Statue: Makes Cow sounds and when right clicked with an empty bowl gives mushroom stew.
Pig Statue: Makes pig sounds and gives porkchops when interacted with.
Rabbit Statue: Makes rabbit sounds and gives rabbit hide, raw rabbit and rabbit’s foot when interacted with.
Sheared Sheep Statue: Makes Sheep sounds and gives mutton when interacted with.
Sheep statue: Makes Sheep sounds and gives the appropriate color of wool when interacted with. (note as of version 0.7 there is only a white version, this will change soon).
Slime Statue: Makes Slime sounds and gives slimeballs when interacted with.
SnowGolem Statue: Makes SnowGolem sounds and gives snowballs and pumpkins when interacted with.
Tier four: Functional
Baby Zombie Statue: Gives Rotten Flesh when interacted with.
Blaze Statue: Gives Blazerods when interacted with.
Chicken statue: gives feathers and eggs when interacted with.
Cow statue: When Right clicking with an empty bucket it fills the bucket with milk.
Creeper Statue: Gives Gunpowder when interacted with, may or may not spawn a creeper with a short fuse. Image may be NSFW. Clik here to view.
Mooshroom Statue: When right clicking with an empty bowls gives you mushroom stew.
Pig Statue: gives Porkchop when interacted with.
Rabbit Statue: Gives raw rabbit and Rabbit hide when interacted with, and a low chance for a rabbit’s foot.
Sheared Sheep Statue: Gives Mutton when interacted with.
Sheep statue: Gives Mutton and the appropriate color of wool when interacted with.
(note as of version 0.7 there is only a white version, this will change soon).
Slime Statue: Gives slimeballs when interacted with.
SnowGolem Statue: Gives Snowballs and Rarely a pumpkin when interacted with.
Eastereggs and how to get them
Tier one: Decorative only
Flood statue
King Cluck Statue
Tier two: Musical
Flood statue: Makes Zombie sounds when interacted with.(note this will change soon)
King Cluck Statue: Makes Royal Chicken sounds, sounds like normal chickens.
Tier three: musical and functional
Flood statue: Makes Zombie sounds and shoots fireworks when interacted with.(note the sounds will change soon)
King Cluck Statue: Makes Chicken sounds and gives Royal nuggets and old nugets when interacted with.
Tier four: functional
Flood statue: Shoots Fireworks when interacted with.
King Cluck Statue: Gives Royal Nuggets and rarely Gold Nuggets when interacted with.
Why are they an Easteregg?
Flood statue: Reference From Mindcracker Docm77 Season 4 Base where he flooded the perimiter for his witchfarm, a baby zombie tracked a villager through a maze as a part from a rube goldenberg machine.
King Cluck Statue: Reference From Former Mindcracker BTC King Cluck shop in Mindcrack season 4
How to get them: No spoilers just clues
Flood statue: Place a Baby zombie statue on a block that appears to be water.
King Cluck Statue: Chickens are not royals, prove me wrong by placing them on a shiny block.
How to get them: be warned this one contains spoilers
Flood statue: Place a Baby Zombie Statue (tier one) Statue on a Lapis block
King Cluck Statue: Place a Chicken Statue (tier one) on a Gold Block
Image may be NSFW. Clik here to view.Image may be NSFW. Clik here to view.Image may be NSFW. Clik here to view.Image may be NSFW. Clik here to view.
Image may be NSFW. Clik here to view. Image may be NSFW. Clik here to view. Image may be NSFW. Clik here to view. Image may be NSFW. Clik here to view.
 Image may be NSFW.
 Image may be NSFW.
 Image may be NSFW.
 Image may be NSFW.
 Image may be NSFW.
 Image may be NSFW.
 Image may be NSFW.
 Image may be NSFW.
 Image may be NSFW.
 Image may be NSFW.
 Image may be NSFW.
 Image may be NSFW.
 Image may be NSFW.